Introduction
Nowadays, The concept of cloud computing is becoming increasingly popular. Many of the businesses spanned across various parts of the globe tend to adapt the cloud as it offers various means to provide the customers with highly scalable, agile, flexible service offerings at low capital, operational and maintenance costs. As a result, the customer attraction towards the cloud services has been increasing over the last couple of years and that has been one of the key driving forces which lies behind the emergence of various vendors who provide Cloud based services.
Among such vendors, WSO2 is considered one of the strongest competitors in the cloud space, recently introducing
WSO2 StratosLive, the most complete and innovative Paas(Platform as a Service) which comes as a composition of various services representing its own unique product stack comprising
ESB-as-a-Service,
Data-as-a-Service, etc, which are completely built upon WSO2 Carbon, the most comprehensive enterprise middleware platform introduced by WSO2.
WSO2 RSS (Relational Storage Service)
Almost all the applications irrespective of whether they are run on the cloud or as a piece of standalone application, have got the requirement of storing and manipulating data associated with their numerious operations. That in turn brings forward the need of having a proper storage solution which caters all such data related requirements of those applications. Although there are diverse set of options available for standalone applications to be used locally to store data, not many options provide such storage capabilities and easy access to those stored data in the cloud space. WSO2 Relational Storage Service(RSS) which comes as a part of WSO2's the most complete PaaS (Platform as a service) offering, StratosLive, is capable of fulfilling all such data related requirements of applications running on the cloud. This particular post mainly aims at providing the community with a comprehensive understanding about WSO2 RSS and its offerings.
Delving into the storage solutions offered by WSO2 RSS, it gives you the total control over your data storage space, absolutely
FREE of charge, by allowing you to create and manage your data storage space on your own via an easy to use user-interface. The users are completely given the ability to make their choice out of the two below mentioned options depending on the requirements.
1. Create and manage their data storage space within the WSO2 RSS.
2. Add user-defined RDS instances and manage them using WSO2 Data-as-a-Service user interface.
WSO2 RSS is implemented based on
Amazon Relational Data Storage(RDS) System. Thus it inherits all the benefits offered by the Amazon RDS which could be thought of as an added advantage.
Having had a good insight into the storage solutions offered by WSO2 Data-as-a-Service, let's further explore how you can actually implement each of those aforementioned solutions with WSO2 RSS.
* Creating and managing your databases within WSO2 RSS.
Now, let's look at how we can create a database and perform related tasks such as creating database users and assigning them to databases, creating carbon datasources and dataservices using those databases, etc.
Step 1: Creating your database within the WSO2 RSS.
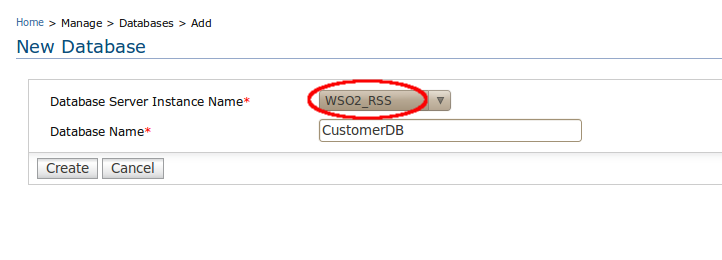
The first step in the process of consuming WSO2 Relational Storage Service is to create a database for your application in the WSO2 RSS storage space. As the figure below depicts, the WSO2_RSS option together with the set of your own RDS instances that are configured to be used to manipulate your application data, will be listed out in the select box which carries the label "Database Server Instance Name". There you can either use WSO2 Relational Storage Service or your own RDS instances to create and consume your database. Once you select your preferred storage solution, you can then proceed with the creation of your database. The user is given the ability to specify a preferred name for the database under "Database Name". Once you click on the create button after fulfilling the aforementioned requirements, you will be able to create the database of your own choice to store the application data manipulated within your own domain.

The first step in the process of consuming WSO2 Relational Storage Service is to create a database for your application in the WSO2 RSS storage space. As the figure below depicts, the WSO2_RSS option together with the set of your own RDS instances that are configured to be used to manipulate your application data, will be listed out in the select box which carries the label "Database Server Instance Name". There you can either use WSO2 Relational Storage Service or your own RDS instances to create and consume your database. Once you select your preferred storage solution, you can then proceed with the creation of your database. The user is given the ability to specify a preferred name for the database under "Database Name". Once you click on the create button after fulfilling the aforementioned requirements, you will be able to create the database of your own choice to store the application data manipulated within your own domain.

Having created a database, let's delve into how you can create database users and assign them to the database created in the first-most step of the process.
Before we create such database users upon a particular database, we introduce the concept of database privilege groups which allow you to create a group of database privileges that are intended to grant a particular database user and then reuse that group of privileges to create users which would considerably reduce the time associated with that task. It is interesting to explore how we can create such privilege groups before we move towards our main task of creating database users.
Step 2: Creating permission templates to be assigned to database users.
In this step, the users are given contorol over coming up with their own permission schemes that will be granted to their database users later. As the figure below shows, it's simply a matter of selecting the permission just by clicking on the check boxes associated with a particular database permission which helps you avoid tedious tasks such as writing lengthy SQL queries and executing them to grant database privileges for a particular database user.
Once you are done creating a privilege group, it will be listed out in the page titled "Database user privilege groups" as shown in figure below.
After creating privilege groups, then use them in creating database users. This is discussed in step 3.
Step 3: Creating database users and attaching them to the created database.
The "Add new user" user interface allows you to specify a name and a password of your choice for a particular user. It also lists down the prvilege groups that you created under step 1 so that you can select the appropriate permission scheme which is intended to grant the database user. Once you successfully fulfil the above requirements and click the save button which can be located at the bottom of the image, a database user will be created to be used in the data manipulative tasks carried out in your tenant domain.
At the successful completion of the aforementioned task, you will be able to observe the database user that you've just created in the "Database Users" page as depicted in the figure below. Now you can use this user to carryout various database related tasks such as exploring the databases and configuring it with using your own schemas, creating carbon datasources to be used in the process of creating dataservices, etc.
Step 4: Configuring your database with your own schemas, etc.
Having successfully created a database and attached a database user, you now need to configure your database so that it suits your own requirements. This task is also made quite simple with the database explorer that we've integrated into the database management user interface by which you can execute your desired SQL schemas to configure the database the way you prefer. To get you redirected to the database explorer, click on the "Explore Database" option listed under the "Actions" category in the "Database Users" page.
Next, you can execute your SQL scrips in the console given to you by the database explorer page and configure your database as described earlier.
Although we're almost done with our task, let us now discuss a couple of other enticing functionalities offered to you via the management console of the WSO2 Relational Storage Service.
Step 5: Creating carbon datasources pointing your databases.
Carbon Datasources play a vital role in carbon as it provides means to reuse relational database connections in various data manipulative tasks carried out across the platform. Thus, the create datasource option offered as an administrative action can be a handy feature whenever a user wishes to create such a carbon datasource out of the database which we've created in the earlier steps. Just clicking on the "Create Datasource" will get this task done for you in a matter of seconds.
Now, you can observe the entry corresponding to the carbon datasource created in the previous step if you browse the Data Sources option which comes under the Configure menu of the management user interface as shown below.
The "Generate" data service option that comes as a part of WSO2 Data Services Server can now be used to create a dataservice upon the datasource created in the previous step and deploy in absolutely no time. As it is shown in figure below, you can select the desired datasource out of the listed data sources, the appropriate database name that is given to you at the completion of creating a database and proceed with creating a dataservice and eventually deploy it.
Step 6: Creating data services using those created carbon datasources.
* Adding user-defined RDS instances and managing them using WSO2 DSS user interface.
WSO2 Relational Storage Service not only gives you the ability to use the storage space offered to you by the service itself, but also offers you the ability to use your own RDS instances to be used in your data manipulative activities. Let's investigate how to achieve that functionality via the user interface of the WSO2 Data Services Server.
Step 1: Add your own RDS instances.
In order to add your own RDS instances to the system, you can simply use the "Database Server Instance" option which can be loacated under the "Configure" menu of the management console. You can fill up the fields depenending on your preference and add your RDS instance to the system to be used as a data store for the applications running under your tenant domain.
Step 2: Create your database within the user defined RDS instance instead of using WSO2 RSS.
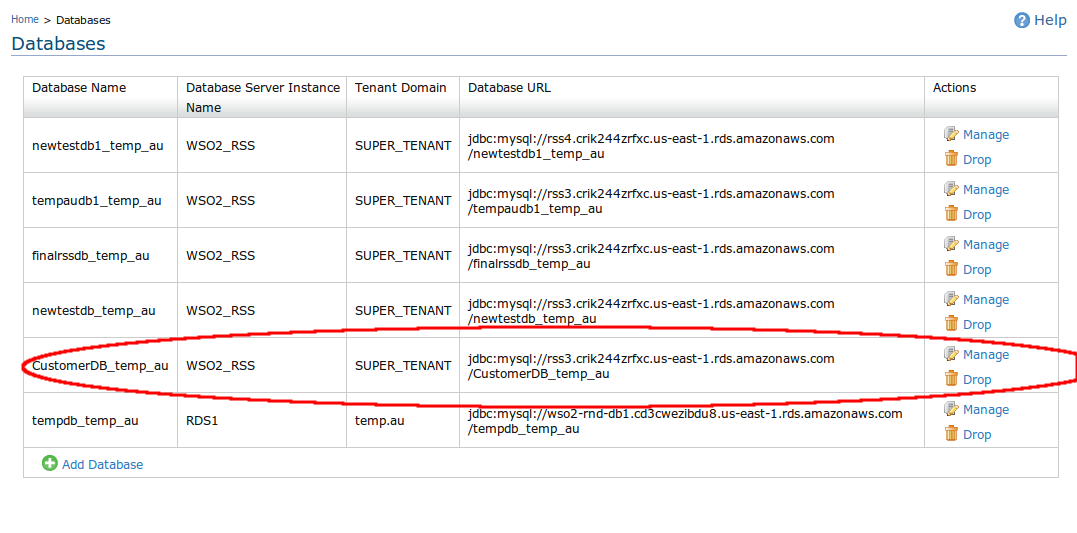
Once you're done adding your own RDS instance to the system, the rest of the process of creating databases and managing them is as same as described in step 1 of the previous category.
This way you can select your preferred data storage solution and continue experiencing the awesome set of functionalities provided by StratosLive, the most complete PaaS offered by WSO2.
Try
StratosLive NOW!


